
 FREE DELIVERY FOR ORDERS ABOVE $100 ALL AROUND SINGAPORE!
PRODUCTS

W5100 Ethernet Shield for Arduino
MODEL: ARD-W5100ES
(per piece)
W5100 Ethernet Shield for Arduino
For Ethernet W5100 Network Shield for Arduino UNO Mega 2560 1280 328 Support MEGA Network Expansion Module.
The Arduino board can be connected to the Internet using this Ethernet Shield which is based on the
WIZNET W5100 Ethernet chip . The Wiznet W5100 provides a network (IP) stack capable of both TCP and UDP.
WIZNET W5100 is the classic one , widely used by Arduino.CC .
WIZNET W5500 is used by Arduino.ORG & is referred as Ethernet shield 2.
We shall use the classic Ethernet shield W5100 in this post.
The shield has long pin headers to plug on the Arduino (UNO or MEGA). Other shields can be stacked on top of this board.There is an onboard micro-SD card slot, which can be used to store larger files.
The Ethernet Library is used to write sketches which connect to the internet using the shield. You need not download the library , as it is inbuilt in Arduino IDE.
The on-board micro SD card reader is accessible through the SD Library. Both the SD card reader & Ethernet board work on SPI bus .
The shield also includes a reset controller, to ensure that the W5100 Ethernet module is properly reset on power-up.
This board is different from the economy version using ENC28J60 device.The library for this ENC is different , ETHERSHIELD library hosted by NANODE project.Libraries are different for WIZNET board & ENC board.
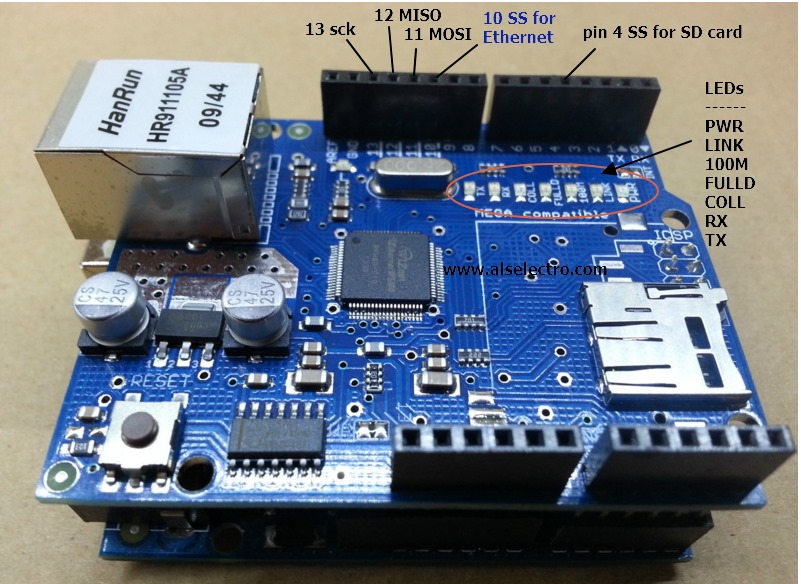
Arduino communicates with both the W5100 and SD card using the SPI bus (through the ICSP header). This is on digital pins 10, 11, 12, and 13 on the Uno and pins 50, 51, and 52 on the Mega.
On both boards, pin 10 is used to select the W5100 and pin 4 for the SD card. These pins cannot be used for general I/O. On the Mega, the hardware SS pin, 53, is not used to select either the W5100 or the SD card, but it must be kept as an output or the SPI interface won’t work.
As the W5100 and SD card share the SPI bus, only one can be active at a time. If you’re not using one of the peripherals in your program, however, you’ll need to explicitly deselect it. To do this with the SD card, set pin 4 as an output and write a high to it. For the W5100, set digital pin 10 as a high output.
The shield provides a standard RJ45 Ethernet jack.A straight RJ45 cable is used to connect the shield to the Router.
A RESET button is on the shield which resets both the W5100 and the Arduino board.
The shield contains a number of informational LEDs:
- PWR: indicates that the board and shield are powered
- LINK: indicates the presence of a network link and flashes when the shield transmits or receives data
- FULLD: indicates that the network connection is full duplex
- 100M: indicates the presence of a 100 Mb/s network connection (as opposed to 10 Mb/s)
- RX: flashes when the shield receives data
- TX: flashes when the shield sends data
- COLL: flashes when network collisions are detected
Apart from these LED s , there are 2 more LEDs seen below the RJ45 jack.When Ethernet cable is inserted from a working Router , you can see these LEDs glowing below the RJ45 jack, one glows steadily & the other blinks as per data flow.
The examples in this section will all make use of the Arduino Ethernet Library.This library comes with Arduino, so no downloading or installing required
You can see the examples under File –> Examples –> ETHERNET

The Ethernet library allows the Arduino to turn into one of two Ethernet devices: a client or a server. Turning your Arduino into client allows you to connect to and request data from servers.
Another example included with Arduino’s Ethernet library is WebServer. This sketch sets up the Arduino as a server device, and hosts up a webpage whenever a client connects to it. The webpage is simple – it shows the status of the analog pins.
Open the WEBSERVER sketch
Webserver is a simple sketch which will display on a web browser, the data gathered from the analogue inputs. However don’t upload it yet, it needs a slight modification.
You need to specify the IP Address of the Ethernet shield – which is done inside the sketch. This is simple, go to the line:
IPAddress ip(192,168,1,177);

You can alter it to match your own setup. For example, in my home the router’s IP address is 192.168.1.1, the pc is assigned 192.168.1.6 , the tablet is assigned 192.168.1.3 , .. As the IP address is in the range 192.168.1.xxx , I just leave this to 192.168.1.177
You also have the opportunity to change your MAC address.As we use only one shield , we can leave this as it is.
To know the IP address , go to Control panel –> Network & Internet –> Network & Sharing Center
Click on your Internet connection .On the next window click Details to see the IPV4 address of your PC.


You can also use a IP SCANNER tool to know all the IP address allotted by your Router
http://www.advanced-ip-scanner.com/download.php?lng=en

Now upload the sketch to your Arduino.
Open your web bowser & type in the IP address 192.168.1.177:80 , the port address 80 is default for HTTP.Hence you need to type just the address 192.168.1.177 in the URL bar ,skipping the :80 part.
The web browser will query the ethernet shield, which will return the values from the analogue ports on the Arduino board.As such we’ve not connected anything to the Analog pins of Arduino, you get random values refreshed every second.

Remember , this is from a local browser & not from outside world.If you like to see the webserver from anywhere in the world , you need to PORT FORWARD your Static IP address to this local IP address 192.168.1.177 .This is set inside the Router’s configuration.
If your IP is not Static (mostly Dynamic which changes on every reboot) , you need to register with a service like www.noip.com
For more details of port forwarding , consider reading this post & video
https://alselectro.wordpress.com/2015/07/04/port-forwarding-part-2-solution/
https://www.youtube.com/watch?v=CyjWgqS8z2w
A simple sketch to print out the Gateway IP, IP of your Ethernet board, DNS is given below :
//<code>
#include <SPI.h>
#include <Ethernet.h>
byte mac[] = { 0x00, 0xC3, 0xA2, 0xE6, 0x3D, 0x57 };
void setup() {
Serial.begin(9600);
while (!Serial);
Serial.print(“Establishing network connection… “);
if (Ethernet.begin(mac) == 0) {
Serial.println(“FAILED!”);
}
else {
Serial.println(“OK!”);
Serial.print(“IP Address: “);
Serial.println(Ethernet.localIP());
Serial.print(“Default Gateway: “);
Serial.println(Ethernet.gatewayIP());
Serial.print(“Subnet Mask: “);
Serial.println(Ethernet.subnetMask());
Serial.print(“DNS Server: “);
Serial.println(Ethernet.dnsServerIP());
}
}
void loop() {
}
//</code>
Upload the sketch & open the Serial monitor to see the result.

Example Sketch 2 : Display a web page from Arduino
———————————
#include <SPI.h>
#include <Ethernet.h>
byte mac[] = { 0xDE, 0xAD, 0xBE, 0xEF, 0xFE, 0xED };
IPAddress ip(192,168,1,177); // change IP address according to your network
EthernetServer server(80); // create a server at port 80
void setup()
{
Ethernet.begin(mac, ip); // initialize Ethernet device
server.begin(); // start to listen for clients
}
void loop()
{
EthernetClient client = server.available(); // try to get client
if (client) { // got client?
boolean currentLineIsBlank = true;
while (client.connected()) {
if (client.available()) { // client data available to read
char c = client.read(); // read 1 byte (character) from client
// last line of client request is blank and ends with \n
// respond to client only after last line received
if (c == ‘\n’ && currentLineIsBlank) {
// send a standard http response header
client.println(“HTTP/1.1 200 OK”);
client.println(“Content-Type: text/html”);
client.println(“Connection: close”);
client.println();
// send web page
client.println(“<!DOCTYPE html>”);
client.println(“<html>”);
client.println(“<head>”);
client.println(“<title>Arduino Web Page</title>”);
client.println(“</head>”);
client.println(“<body>”);
client.println(“<h1>Hello from Arduino!</h1>”);
client.println(“<p>A web page from the Arduino server</p>”);
client.println(“</body>”);
client.println(“</html>”);
break;
}
// every line of text received from the client ends with \r\n
if (c == ‘\n’) {
// last character on line of received text
// starting new line with next character read
currentLineIsBlank = true;
}
else if (c != ‘\r’) {
// a text character was received from client
currentLineIsBlank = false;
}
} // end if (client.available())
} // end while (client.connected())
delay(1); // give the web browser time to receive the data
client.stop(); // close the connection
} // end if (client)
}